Related Topics
Meta Business Suite: The Ultimate Guide
How To Master Meta Business Suite (Formerly Facebook Business Suite)

Table of content :
Meta Business Suite: What Is It?
Why Choose Meta Business Suite:
Understanding Meta Business Suite:
Benefits of Meta Business Suite:
Implementing Meta Business Suite:
Avoid These Mistakes While Setting up Meta Business Suite:
Who Should Use Meta Business Suite?
A Quick Comparison: Facebook Business Manager, Facebook page manager, and Meta Business Suite
Are you still managing your Facebook pages and ad accounts via your private account? Sharing your login data could hinder your privacy, and manually operating and assigning tasks to teammates is quite difficult.
High-end necessities like these make it crucial for firms and agencies to opt for the Meta Business Suite. The fantastic tool ensures users safely manage their Facebook activity and ads without hassle.
So, if you haven't begun using the striking tool because it seems confusing, then this guide will aid you the finest. The article has all insights on using the Meta Business Suite and how it profits your business in multiple ways. To know more, let's get started to work.
Learn More about - Facebook Marketing
Meta Business Suite: What Is It?
As the name tells, the Meta Business Suite is a tool that aids you in managing multiple Facebook pages and ad accounts more efficiently. You can manage all your firm's assets, catalogs, and Instagram accounts in a single place with no issue.
To tool permits a complete or partial entree to teammates depending on their specific tasks. We mean one can simply operate and work on multiple tasks with their employee effortlessly. In the case of agencies, they can benefit by linking multiple customers' Facebook Pages to the manager account without giving access to any personal administrator details.
And lastly, for businesses, it permits them to grant permits to employees to access the Facebook Page without necessitating any ownership or complete control. Some chief functions of the Manager are:
All firm and personal activities are kept separate, so one does not have to bother about posting in the wrong account.
One-stop destination to inspect all Facebook ads and in-depth reports indicating ads performance and growth rate.
It permits you to give access to clients, partners, and firms to handle Facebook pages and ad accounts without altering any settings or handing over complete ownership.
Colleagues do not get access to personal data. Only Facebook page, ads account, email, and name are displayed.
Why Choose Meta Business Suite:

The chief reason to use this striking tool is to improve your overall focus on your work. Whenever you log in to your account in the Facebook manager, you get direct access to your firm's assets on Facebook. Further, you can operate the Facebook page, Ad account, and other firm-related assets without viewing the personal feed or any other details by using the tool.
The next fine reason to opt for the Meta Business Suite is securing and organizing your Facebook page-related data. If you're exploring innovative business ideas to earn money, setting up a solid online presence is crucial. So, if you are handling more than one Facebook page, ad account, or assets for your firm or clients, you can benefit a lot by using this profitable tool.
The suite also lets you glance at your pages, ad accounts, individuals working on assigned tasks, etc.
The tool is most useful when granting access to multiple of your firm's Facebook assets to varied individuals. You can also cancel and revoke permits if the employee no longer works with you. So, instead of taking additional effort to remove the individual from the list, you simply need to navigate to the People section in Business Suite and cancel their access permit with a click.
Talking of individuals with Business Suite, you do not necessitate to be Facebook friends with them to assign them tasks for your Facebook pages, ad accounts, and more. You only require access to Meta Suite to assign tasks accordingly. These individuals do not necessitate any details about your profile, and neither do you have to view theirs.
You know why the Business Manager is crucial for you; here are a few things you can implement via it to benefit most.
1. Generate New Firm Assets
If you haven't used the Business Suite earlier, the first step is to set up your account by visiting business.facebook.com/overview. After successfully setting up your Business Suite account, you must also create asset pages.
After setting up the account, navigate to the Business Settings tab.
Further, it is vital to note that while creating assets with the Business Suite, you will not be direct by a standard wizard. For example, to generate a fresh Facebook page, you must tap on Pages.
After this, pick the Add button and choose Create a New Page with the drop-down bar. Next, the Facebook page will navigate you via the standard wizard to completely set up your new page. If you wish to generate any other asset, follow a similar process using your Manager account.
2. Claim Assets in the Meta Business Suite
To claim the asset, you own (Facebook pages, ad accounts, and more), tap on the respective option to gain access.

After this, navigate to the Add button and select the option to add your pages, ads account, or any other asset you desire. Every asset you opt for will be added by the tool to your Business Manager instantly as you have already granted full access permission to them.
Ensure to only add the assets that you personally own to your Business Suite as only one account can claim the assets. So, if you claim a customer's Facebook page, your client can only request permit access to it; they cannot claim it by themselves. You need to request access to the client's Facebook page, ad account, etc.
Marketers of Bookatrekking, a trekking company that organizes hiking in Austria and other types of outdoor activities, says that it is a highly notable aspect to consider while claiming ad accounts. However, as pages can be detached from the Manager account, ad accounts can't. Thus, you must avoid claiming an ad account that is not yours.
If you're keen to claim your personal Instagram account to the ad account or page, you can use the Business Settings and simply tap on Instagram Accounts. Select the Connect Your Instagram Account option to commence.
3. Permit Access to Firm Assets

If you do not own the firm asset (catalogs, ad account, or pages), you can extend a request to add that specific asset to your manager account.
The owner or admin must approve the request for these assets to be added to your Business Manager. Also, note that Facebook limits the number of assets you can request from admin or owners.
This option is only available for individuals that work for multiple clients or for assets that they don't own. Follow simple steps to add these assets to your Facebook Manager using the right guidance.
4. Manage the Assets in the Facebook Manager Account
After requesting, claiming, or creating business assets, you can manage them easily using the Meta Business Suite.
- Pages
Navigate to the Pages section to check the available pages for access in the Business Manager. After viewing them, select a specific page to acquire extra options and details for that asset.
You can check on the people assigned for the specific tasks or roles here. Further, adding and eliminating these individuals from your Facebook Manager is also quite manageable.
Next, tap on View Page and navigate to the page you wish to edit to make alterations. View DMs, post on the pages, check notifications, review the growth, schedule posts with top scheduling tools, utilize advanced page settings, initiate promotions, boost performance, alter tabs, etc. You can also delete Facebook pages without hassle.
- Ad Accounts
Suppose there is only one Ad account attached to your Facebook manager account. In that case, you can enable the Ads Manager by tapping on the dot icon located in the top left corner and clicking on the Ads Manager option in the menu.
If there is more than one ad account in the Facebook Suite or you wish to assign individuals for specific tasks in your Ads account, tap on the Ads account option and select the Ad account you wish to handle.
Make use of the buttons to view which individuals or clients are assigned for the tasks in the Business Manager. You can also make additions in this case. Further, deactivating the account is also possible; however, deleting it is impossible.
- Apps
If you have created apps in the developer section of Facebook, you can also add them to the manager account. Doing so makes your tasks much simpler and easy to operate. Identify the App ID from My Apps and use it to add the app to your account successfully.
- Commerce Accounts
Assigning or editing commerce account permits in Facebook Manager is also possible. Navigate to the Business Settings, tap on the Commerce Manager section and pick on the specific account. Now, tap on Add People and pick the permits you wish to opt for functioning.
- Data Sources
You will locate multiple data sources in the Data sources option available in your Business Manager. It comprises product catalogs, Facebook pixels, conversion, and much more.
If you have access to FV pixels in your ad accounts, you'll also locate the data listed under Pixels. You can edit and make amends on each partner and association via this feature.
Simply tap on Catalogs to check the catalogs you have generated for your firm. Creating fresh new product catalogs is also possible along with overall management.
Add, assign and delete individuals as and when you require by using this striking feature in your Facebook manager.
5. Assign Individuals and Add Partner
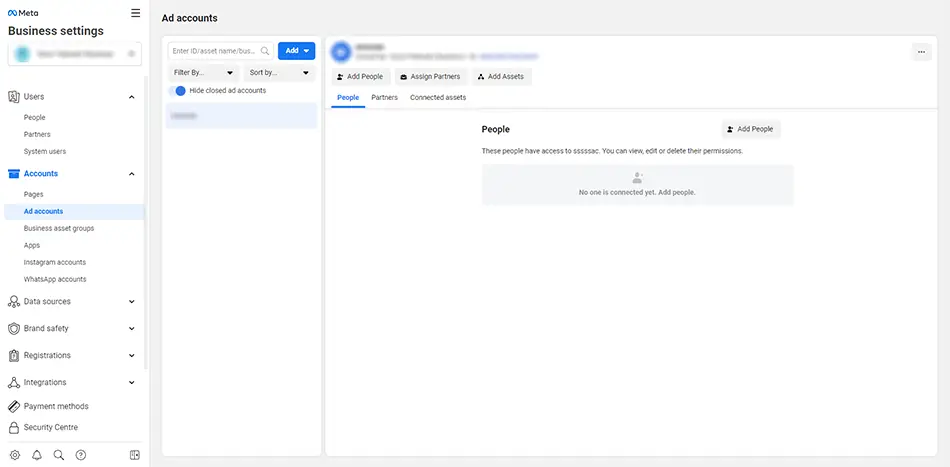
To give other individuals a permit for your Facebook manager, you will have to assign them. Appointing people for specific tasks makes your overall job manageable and quite convenient. Do so by simply making a few alterations in the Business Settings section.
Understanding Meta Business Suite:
Here are a few aspects that will assist you in understanding better:
People are distinct personals that you grant admission to your firm's assets. For instance, if you're operating with a Facebook consultant, you will appoint that person with specific tasks to manage your pages, ad accounts, and assets of similar kinds by giving them access via email.
Partners are firms that you wish to grant permits. For instance, if you work with an agency, you would like to give the agency particular tasks to manage your pages, ad accounts, and varied assets. You can easily link them to your manager account via the Business Manager ID. Later, this grants the agency permitted to appoint specific individuals to access the account to alter pages, other assets, and ad accounts, as required.
Appoint People
To grant specific roles to people, tap on the People under Users, which you will find in the left corner. After doing so, click on add to proceed.
The manager will display a pop-up window, here put in the email if of the individual that you wish to grant permits to your firm's assets. You can also define their roles and mention whether you would like to appoint them as an employee or an admin.
After tapping on Next, the business manager will display several boxes with the varied setting next to the ad accounts and varied assets that you wish to manage. For every specific asset, you can assign particular roles.
After finishing, tap on the Invite option to extend a request to the assigned individual. To check on all individuals that have a permit to access your business assets, tap on People. Here, you do not just view but also assign, appoint and remove people with complete ease.
- Add Partners
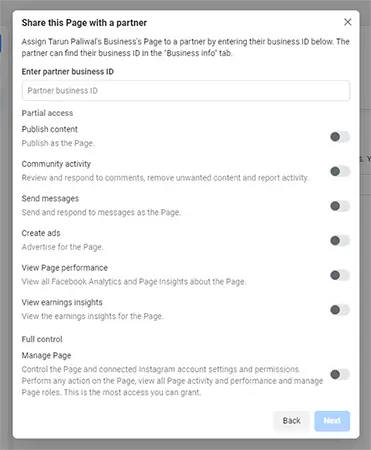
To add partners to the Facebook manager, navigate to the business asset you wish to assign to them. After this, tap on Assign partners to proceed. Next, you will have to add the Business Manager ID to complete the process. You can attain this Id easily from them.
After adding the partners, simply tap on the Partners option to check the partners' access to your firm's assets. You can go to the same option if you wish to dismiss anyone.
Likewise, you must navigate to a business asset for editing the assigned roles and tasks. Tap on the Assigned People / Partners selection to locate more options.
6. Organize Firm Assets in Groups
If you have access to multiple assets and pages in your Business Suit Facebook, you might wish to set groups to work on them well. To accomplish the following, tap on the Business Assets Groups selection. After doing so, select the Create Business Asset Group, and then alter the pages, ad accounts, and other assets accordingly.
It is vital to note that every ad account and page can only have a single group. So, if you necessitate reorganizing, you can eliminate assets from the group and add them to another.
Firm asset groups are not a necessity; yet, they are a handy option if you are using more than one account and have to assign individuals for varied tasks. They make your job simpler and much more manageable. Deleting facebook groups is also attainable.
7. Explore All Options
We know all the primary functions of the Business Suite, but these are some specific features that you must explore.
Payment Systems: Navigate and tap on the Payment Methods option to link payment modes you wish to with your manager accounts.
Requests: All claims and business asset requests will be displayed in the request section of your manager account.
Notifications: You can opt for additional settings to enable Notification alerts to get all updated information about the changes on your manager account.
Benefits of Meta Business Suite:
Now you have all insights about the business manager and its functioning. Also, you have a brief idea of how and why you should use it. However, before using it, noting these top perks of the tool is also a necessity:
Ensures that business profiles and personal ones are kept separate. You no longer need to bother about your privacy or posting on the wrong accounts that could create a wrong impression for your firm.
You can efficiently manage the Facebook Ad Accounts and Pages from a single place without any interruption. It enables you to track all your records and performances from a central point, making your organizing efforts quite simpler.
You can share access with varied individuals. Also, you can grant permits to agencies, vendors, or clients/partners without completely giving the ownership of your business assets.
It helps you control and manage your employee access as well. You can handle all your operations from one place and ensure each employee performs specific assigned roles only. Also, it enables better security and gives you maximum outcomes for your Facebook posts and overall management.
Easily eliminate and cancel permits for people that no longer work with the firm. Also, as Personal Profiles are not linked to the customer's pages, managing and keeping updates become much simpler.
Generate varied audiences for different campaigns. This feature is most beneficial for agencies that require multiple ads for different clients. Also, businesses that have access to more than one client can benefit here.
The Interface of the Meta Business Suite
Before setting up the Meta Business Suite, let’s check its interface to enjoy the complete benefit of the striking tool! Here we have listed a few essential aspects and sections that a newbie must understand before opening a Facebook Business Manager account. Knowing these aspects will help you apprehend the further steps better!
- Home
All your Facebook and Instagram activities will be accessible on this screen. Here, you access tools to generate ads, promote your firms, or view insights. Overall activity overview and details are located on the right, which assists in building engagement and audience performance details. Next, in the lower mid-section, you will view a calendar, audience progress, and the latest ads.
- Inbox
The manager tool will permit you to view and respond to messages in the Inbox section. Further, you can also reply to comments on your online business pages. All details in this fantastic tool are available in one place!
Creating automated responses to enable quicker replies is also possible. The feature aids you in organizing details well, reaching out to potential clients, and creating firm relationships with individuals who interact on your pages and accounts. To create these responses, tap on the “Automated Responses” section.
Facebook also suggests you some automated responses popularly picked by most individuals. Select the response you want and add an apt message to reply to your audience.
- Posts & Stories
The following section is “Posts & Stories.” You can generate, post, and schedule new content to your Facebook page and Insta feed. Further, you can also attain a detailed view of the insights for every post you wish to publish. All you must do is tap on “Create post” to proceed.
After selecting the option, a pop-up window will appear in front of you where the tool will permit you to create your post. You can type your content here, add pictures or video, and set a location. After finishing, you can either post it straight away or schedule it. Also, ensure you avoid these top scheduling mistakes if you are considering to posts later.
- Insights
This tab enables you to check the overall performance of your content, which comprises your reach, stats, response, and other details.
By tapping on “Results,” a complete overview of the connected Facebook Pages and Instagram profiles will be available. Next, if you select “Content,” you can also acquire details about your posts.
Lastly, selecting “Audience” will give you details about audience demographics and a view of potential audiences.
-More Tools
The platform offers many more tools for access apart from basic ones. You can opt for them by tapping on “All Tools.” The section has multiple tools to assist you in improving many aspects. These tools comprise Advertising, Managing business, and more.
We suggest you individually explore each section to familiarize yourself with the tool and its overall functioning.
Implementing Meta Business Suite:
After identifying these basic aspects and perks, you must be sure why you would like to use the Meta Business Suite for your Business and its growth. The crucial part comes after this. Here you will identify how to use the Meta Business Suite properly. Follow these steps for maximum assistance.
1. Set up an Account
You can directly set up your account if you already carry a business account. If you do not carry an account, first, you must construct a page before proceeding further. Without a page, the Facebook manager account will not benefit you much.

First, go to the "Create Account" section on the Business Suite page to set up an account.
A form will appear which you must fill with all the necessary details. Add your firm's name and your details like name and email id. After finishing, tap on "Next."
Next, you will necessitate more information about your firm, like its physical address, contact number, and site. After filling in all details properly, click on "Submit."
The manager will then send you an email for verification needs. Tap on "Confirm Now" in the mail, and you're all set; you have successfully created the Business Manager account.
2. Link Facebook Pages
After creating an account, ensure you attach all Facebook and Instagram pages with your Business Manager account for perfect managing. You will discover two options on your dashboard, i.e., "Add Page" or "Create Page to complete this process.
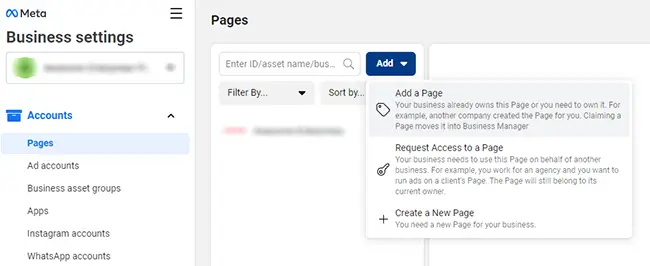
Simply tap on "Add Page" and fill in the page URL or name for linking any existing page. Facebook will automatically accept your request without trouble if you are the admin.
If you are an agency and do not own the firm's Facebook assets, then linking the Page demands a request approval from the client. Navigate to Business Settings, look for the "Pages" section, and tap on "Add." After completing this, tap on "Request Access to a Page" and select the page you wish to access.
After successfully linking the Pages that you are to manage, you can also note the performance and stats of your pages from a single place. The metric comprises important aspects like reach, actions, clicks, etc. The feature enables you to note your growth with complete precision.
3. Attach your ad account
If you wish to run ad campaigns using the Meta Business Suite, you must ensure that you link the ad account that you're managing. Like Pages, you can directly link these accounts if you are the admin of these assets. Tap on "Add Ad Account" to attach the ad account you are using with the assistance of an account ID. If you do not have an ad account, creating one using the Business Manager page is also possible.
Again, similar to the Pages, agencies must request access to a Facebook Ad account similarly. Go to the "Ad Accounts" section and then tap "Add" and "Request Access" to attach the client account successfully. The Facebook Manager will demand the ID to complete the procedure without difficulties.
4. Add Users to the Meta Business Suite
For businesses and agencies, the most crucial aspect is to learn how to add individuals to the Business Manager account successfully. Go to the Business Settings, listed under the "People" section, and tap on "Add" to complete the process.
Add details like the email id of the individuals to proceed. You can also assign roles and tasks to specific individuals. And also, the permits of access like admin or employee using this specific tool.
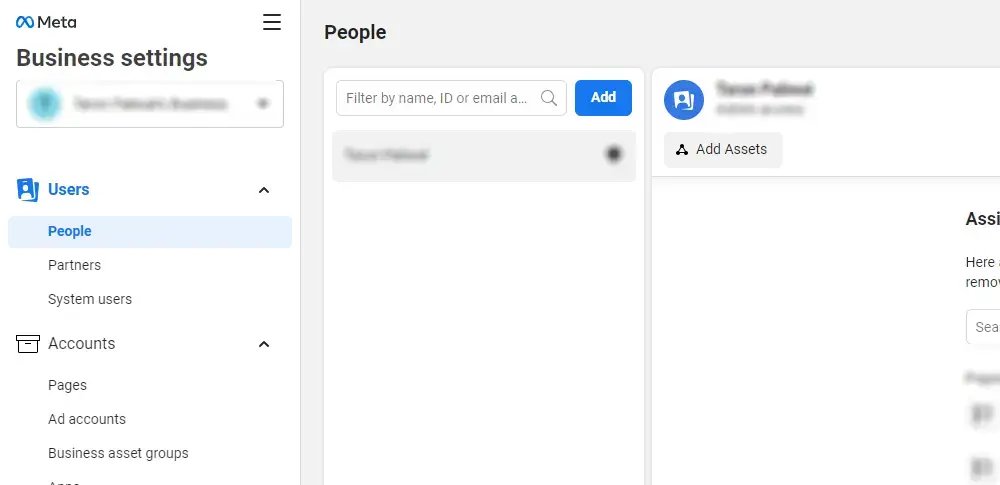
When you enable the employee access, you can also pick the accounts and tools they can get access to use. The feature is ideal for agencies and firms that have to appoint accounts, roles, and projects to multiple teammates. The agencies can also manage the client accounts with utmost ease without risking security.
Most users often face issues with the "Page Owner" accounts. It happens because these users do not acquire admin access on the Meta Business Suite account but only the employee access to the page. Also, note even if only one manager account has ownership of the page, varied accounts can acquire access to it for use.
If you are operating with an organization or business, you can add them as a "Partner." Simply go to the "Partners" section in the Business Settings and add the partners you wish to share the access manager account.
Doing this will grant them a permit to the assets and not complete ownership. Also, they can change the settings and add and eliminate individuals depending on their level and position. Likewise, agencies and businesses must get access or permit from the client to proceed further.
If you wish to give limited access (pick Employee access) and in case of full access permits (pick Admin access). More specific options are also attainable. Also, ensure you add individuals using the work email only. Now to complete the customization processes follow the next steps:
Go to the Pages section in the left menu and select. Pick the pages you wish your teammates to operate. Use the toggles switches to customize the access.
Now, pick the Ad accounts section in the left menu. Once again, modify the user's permits by utilizing the toggle switches. Once it finishes, tap on the invite.
The left menu also has options where you can add individuals to catalogs and apps; however, skipping them is the finest choice.
For adding more teammates, tap on Add More People. After completing the process, select Done.
After this, you need every invitation to accept your invitation for them to be a part of your Facebook Manager. Each of them will obtain an email regarding your access to them. Add a link to simplify the task and a personal message to prevent chaos.
5. Link Business Partners and Agencies
If you are new to Facebook advertising and have just begun, this aspect might not be highly applicable to you. However, you can opt for it in the future.
Go to the Business Setting in your Meta Business Suite dashboard.
Tap on Partners on the side menu on the left. Now in the Partner section, to share the access, simply tap on Add.
The partner must access the Business Manager ID to complete the process. Ask your partner to give you entry for the same. The business ID is readily available in the Business Info section present in Business Settings. Simply enter the ID and tap on Add.
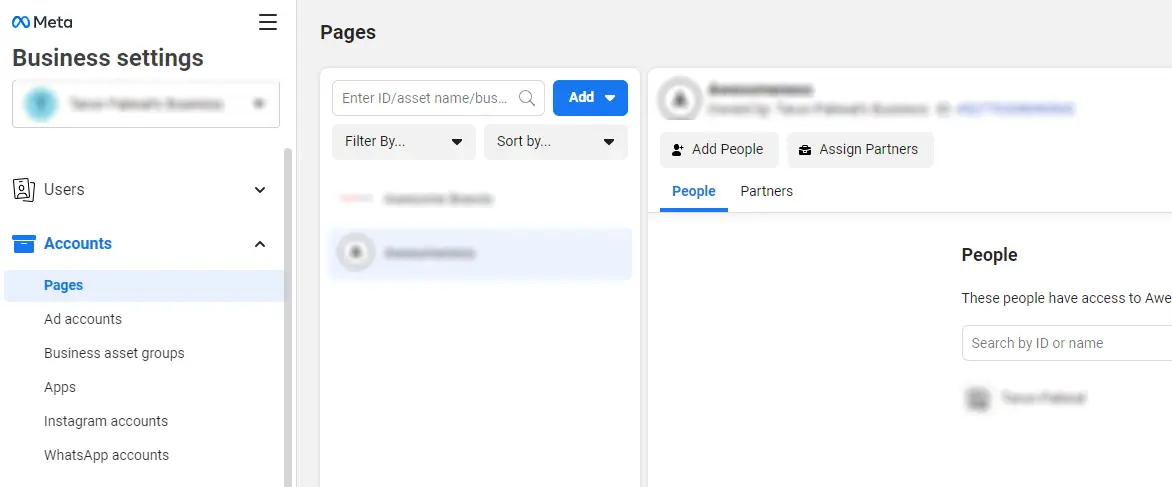
The firm you have added can easily manage access and permits using the Business Manager Account. So, managing permissions and tasks for all individuals operating is no longer your concern. You simply need to check whether all aspects are in place.
6. Add Instagram Account
Now all your Facebook assets are well set, so you can proceed further to add your Instagram account to Meta Business Suite. Almost all organizations in this day do not function on a single social platform. Thus, granting access to Instagram pages makes your tasks simpler and even more manageable.
First, in your Facebook manager dashboard, tap on the Business Settings.
Now, you will locate Instagram Accounts in the left menu. After finding it, navigate and tap on Add. Enter your Login details in the pop-up window to grant complete access.
7. Set up Facebook Pixels
![]()
You must be wondering what the use of this tool is? In simple words, an Facebook pixel is a small code that Facebook generates for you. Placing the code on sites enables you to gain better access and easily track conversions, create target groups for your ads, optimize the Facebook advertisements, and generate leads.
We suggest you set up the Facebook pixel right away without delay, irrespective of whether you wish to run ad campaigns or not. Doing so will enable you to get better information and gain insights that will value you.
Know about Facebook pixels and make great use of them to benefit your firm in many ways. The tool is highly efficient and assists you in functioning with utmost ease. To set the Facebook pixel in your Meta Business Suite, simply take the aid of these steps:
- To commence, go to the Business Settings on your Facebook Manager.
![]()
Tap on Data Sources on the side menu on the left and select Pixels. After this, tap on Add.
You will necessitate a name for the same. Add a name for your Pixels. After completing it add your site so that Facebook will extend the finest possible suggestions for the same. Once you complete this, tap on Continue to proceed. After selecting Continue, you agree to all the T&Cs laid by, so ensure you read them thoroughly before further.
Next, select Set-Up Pixel Now.
Once you finish, all the details will be available. Learn a few details about the pixel tool to utilize it with utmost ease. You can only generate up to ten pixels using your Business Suite.
8. Enable Better Security
The finest perk of opting for the Facebook Business Manager is it offers exceptional safety for your business assets.
Navigate to the Business Settings.
Now, go to Security Centre in the left menu.
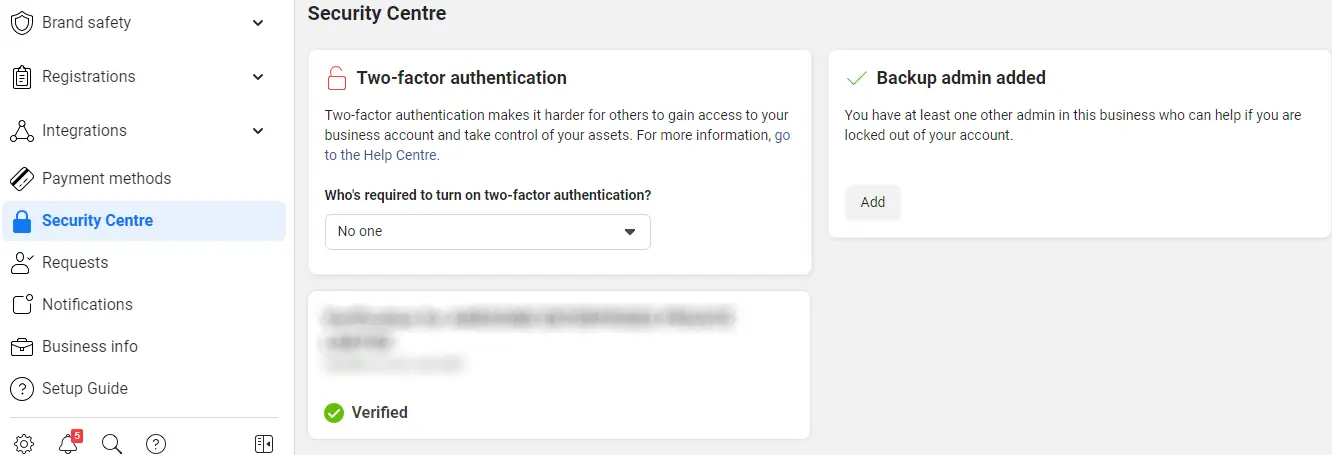
- Set two-factor verification. Ensure you keep it as needed for the finest security practices.
9. Create Ad Campaigns on the Meta Business Suite
After successfully setting the business manager account and pixels, you must know how to create and launch your first advertisement.
Facebook ads must be appealing and compelling for users to attract attention. If the ad is dull, it will attract no client to it no matter how hard you try. Here are simple aspects that will assist you in completing the process with maximum ease. Follow them for fine outcomes.
Tap on the Business Manager in your Meta Business Suite dashboard.
Now navigate to the Advertise option, and tap on Ads Manager. After finishing, click on the create option.
Pick a specific campaign objective, target group, decide on a particular budget and align the ad accordingly. You can also pick on particular ad types and placements by making further modifications.
10. Unite Facebook Business Manager with firm asset groups
As the number of firm assets in your manager account increase, keeping track of all records will become even more difficult. So, here you will necessitate business asset groups for better management. They keep all your records clear and ensure better clarity.
Creating Business Assets Group
Navigate to the Business Settings Option.
Now tap on Business Asset Groups in the Accounts section, then select the 'Create Business Assets Group' option.
You can opt to organize your assets depending on brand, demographics, agency, or any other suitable category, and then tap on Confirm.
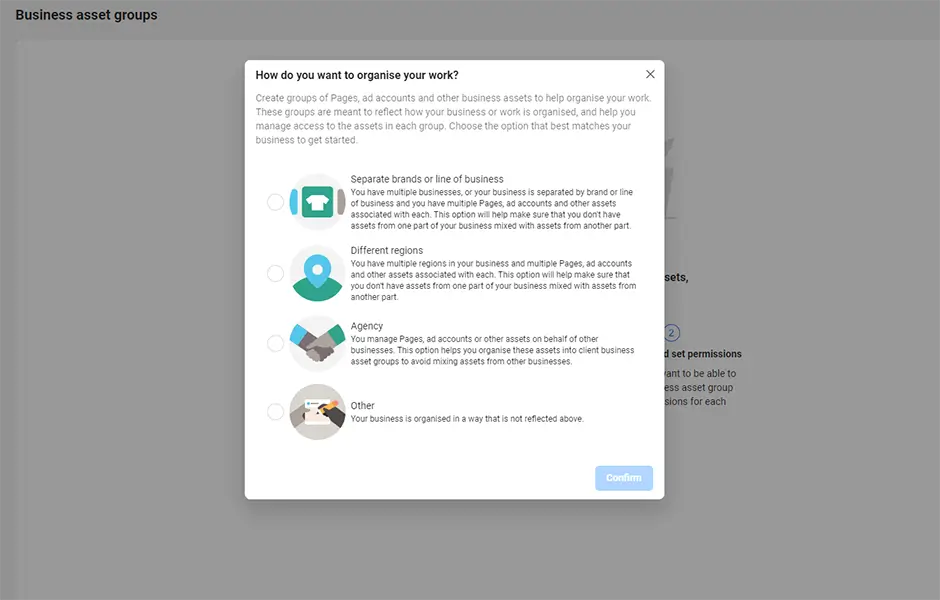
After this, label your assets group.
Pick the assets you wish to add to this group. Here, one can easily add pages, pixels, Insta accounts, and ad accounts. Further, adding offline events, apps, customer conversions, and product catalogs are also possible. After selecting all suitable assets, select Next.
Lastly, pick the individuals you wish to add to this group. You can gain control over the assets in each group via a single screen. Once you finish, tap Create to finish the procedure.
By using all these effective steps, you can easily create and set up a Meta Business Suite account in no time. Completing this process is highly necessary for success. Use the most efficient tips and get your Facebook business needs covered in a single spot. However, read to the end to grab all details. In the following section, we have listed a few mistakes that you must avoid to generate an account correctly. Thus, check on each aspect to finish the task with precision. You can also check this exceptional facebook manager guide for more data.
Avoid These Mistakes While Setting up Meta Business Suite:

Mind Access Levels: Do not give admin access to any individual. The access is only permitted to individuals you trust or teammates who are efficient enough to manage such tasks. Regularly inspect and check the access each individual has on the Business Suite. Also, study and grant access to only a few specific individuals profiting from the pages.
Keep Business and Personal Separate: Most individuals mistakenly consider that linking the Business Suite account with a personal Facebook profile is necessary. However, avoid doing so at all times. There is no compulsion to link the two.
*Ownership Caution: If you consider hiring an agency or individual to operate the Business Manager account, make sure you do not permit complete ownership. Permit only an admin access and no full access. Granting complete access can be highly risky if the relationship between you and the company changes in the future.
Who Should Use Meta Business Suite?
Small firms that can easily manage their social media accounts do not necessitate a Business Suite. However, certain firms do demand the use of it for better ease. Some notable cases are:
- You run a business with multiple social media accounts and need to appoint employees to work on the same.
- You are operating with vendors that assist you in running or managing your ads and/or Facebook Page but do not wish to surrender all assets.
- You're an agency that handles varied social media accounts and ensures their better functioning of them for clients.
- You necessitate control of the individuals that have permits and access to your Facebook Page and do not wish to surrender complete ownership to workers or agencies that handle your Facebook business assets.
Best Practices from Facebook Business Suite:
1. Implementing Facebook Pixel:
As we have read before, Facebook Pixel can assist you in several profitable ways. It is a bit of code that assists in the better functioning of your website. The code helps you track records, conversions, and the performance of the Facebook ads and other leads on your website. Setting up this essential tool in your Business Suite can benefit you in noting success and upgrading it. To enable Facebook Pixel to follow these aspects:
Navigate to "Data Sources" in Business Settings and direct to "Pixels."
Next, tap on "Add" and add a pixel name and site domain. After finishing, tap on "continue."
Select the "Set up the pixel now" option to complete the process.
2. Enhancing Security Measures: In Business Suite, Facebook permits you a better sense of protection to guard your firm's assets using a two-factor verification process. Ensuring complete security is a must to prevent any mishap on your business profile. To enable the finest security:
Go to the "Business settings," and next tap on "Security Center."
Set the verification by selecting the "required for everyone" option.
3. Streamlining Location Setup:
If your firm or a firm you're partnering with has varied locations, you can opt for the Location function in the Business Suite.
Tap on the "Business Manager" option and opt for the "Shop locations" selection in the "Assets" section.
Now select "all tools," navigate to manage business, and tap on "shop locations." After finishing, select "stores."
You can add the stores by filling in details or use a spreadsheet to do the same if there are multiple stores.
4. Ensuring Brand Security:
The exceptional option is available to further along with "domains & blocked lists." The domain section permits to set specific domains for each business page to authenticate page ownership.
Blocked lists are most suitable for finer control of when and where the ads will be seen. You do not wish for the ads to be displayed on irrelevant sites. Doing so will not profit you in any way. If there are irrelevant targets or you know that your audience will not visit these sites, add all these domains to your blocked lists to avoid displaying ads. You can also create fantastic Facebook preview links to promote your posts using this tool.
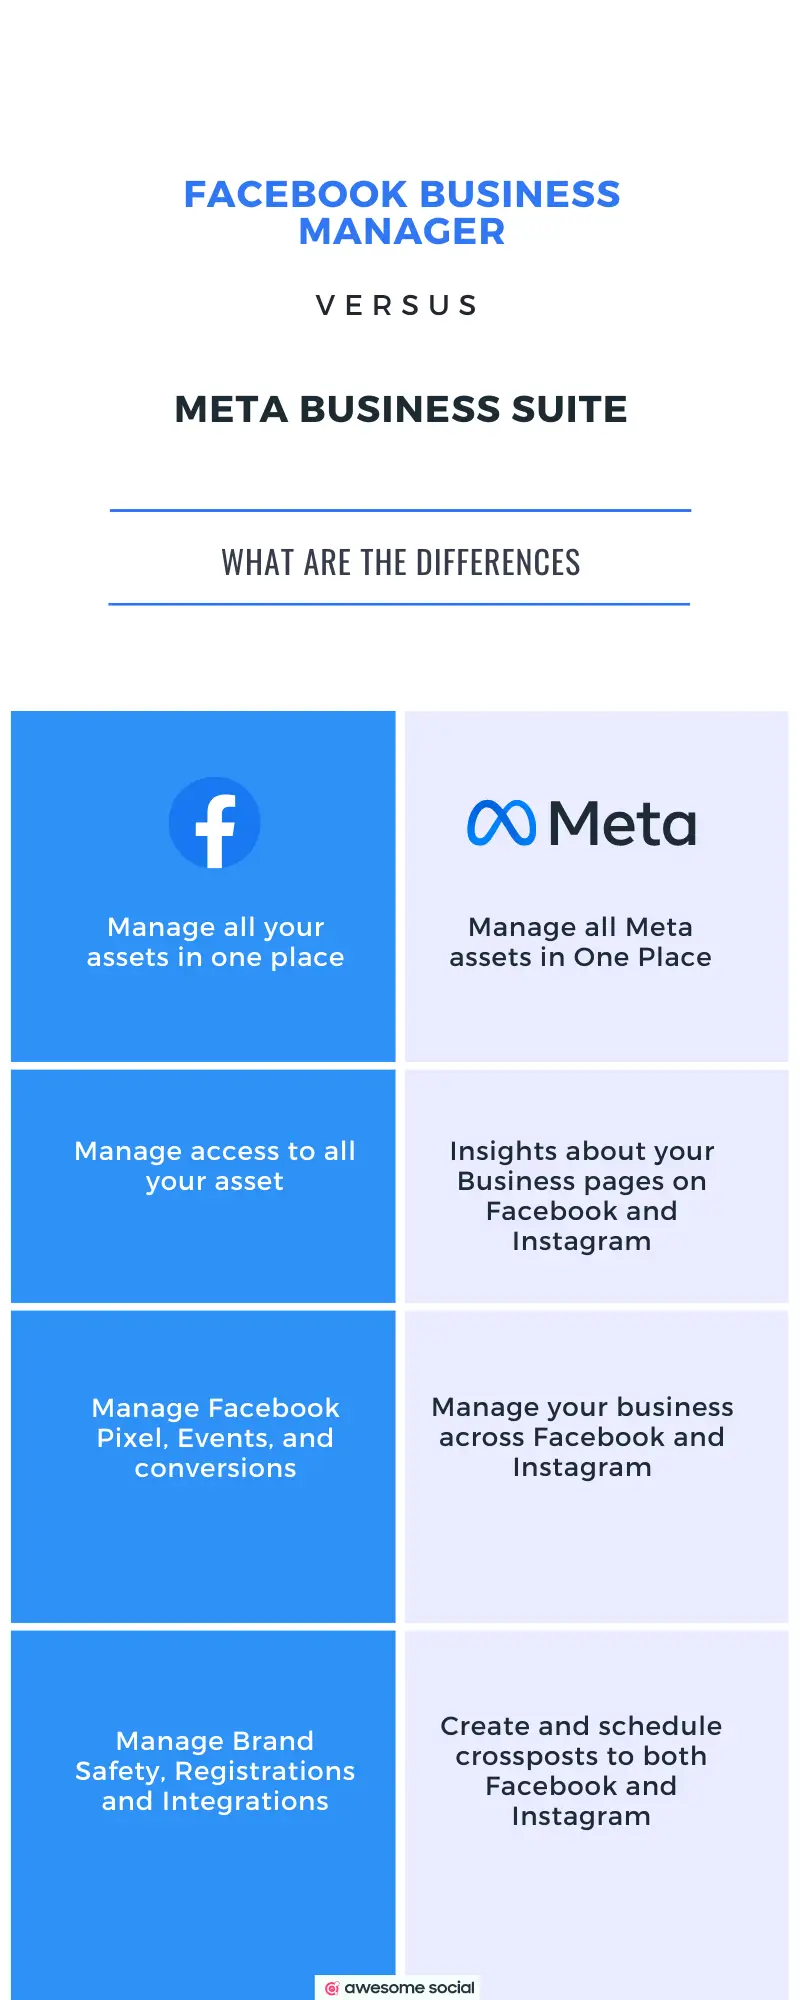
A Quick Comparison: Facebook Business Manager, Facebook page manager, and Meta Business Suite
While managing any Facebook page on the business manager tool, you will identify endless management options and perks. Also, with the advancing age and new technological introductions, it's common to notice changes around you.
If you are confused about which tool is the most suitable choice, remember you are not the only one. Lately, in Sept 2020, Facebook introduced the Business Suite with not much warning, which further confused users and led to the page manager's re-introduction. With time, a fresh add-on has been attached to the Business Suit Facebook list. The tool is striking; however, it has confused users again about whether they should opt for it or not. Here we have listed clear distinctions between the three management tools. Go through each one to find a suitable pick for you. Every detail and aspect of these tools are listed below. Thus, read on and discover more.
1) Facebook Business Manager
Let's begin with the first and least robust tool in your Facebook assistance. The Business Manager is the longest in the market out of all these three tools and is certainly a high-level tool. Apart from concentrating on creating content or interacting with clients, the Business Manager is also helpful in managing your page's assets and advanced settings.
This tool can handle all your business pages, ad accounts, catalogs (specific), apps, etc. Further, managing Facebook Pixel, users, events, payment methods, and registrations are also possible. Know how to use the business manager more effortlessly for maximum gains.
If you have been using the Business Manager for a long time, switching products might seem time-consuming. However, we suggest you must familiarize yourself with the latest tools as well. The Facebook Analytics is nearly gone away, and soon the Business Manager will also be ruled out with the new introductions.
2) Facebook page manager
Facebook introduced the next advanced tool in 2020 to take over the Facebook page manager. Its chief aim is to reorganize all interactions with your followers, including communication on posts and DMs.
 Business Suite assists the users in the following:
Save hours: You can post on Facebook and Instagram simultaneously and manage the posts in a single place to ensure better interaction with online communities.
Keeps You Updated: You can acquire all your Instagram and Facebook messages and notifications, and reminders in a single place. Further, this enables to keep the accounts updated and respond more efficiently.
Business outcomes:
Notice and check on all activity with the assistance of your Facebook and Instagram insights. Also, learn what your clients are seeking and make amends accordingly. Certain key aspects of the Meta Business Suite comprise the following:View Performance at a Glance: The home screen of your Business Suite permits you to see an overview of your Facebook Page and the Instagram handle. You can check on all updates, latest posts, and ads and also discover insights for progress. Further, creating new posts and promoting them is also quite possible using this feature.
Displays Activity: You can view new notifications for your pages and accounts linked with a single tap. All the insights are easily accessible on the home screen.
Utilize Inbox: Check and read new messages and comments on your Facebook page, Messenger, and Insta handles using this fantastic tool. You can also pick automated responses simultaneously and quickly respond to users. Further, hiding comments and scheduling group posts also becomes simpler.
Make Posts and Create Stories: Publishing and scheduling new stories and posts for your Facebook Page and the Instagram handle is also manageable.
Use Commerce Manager: If your firm account acquires a Commerce Account, you can access it via your business suite home screen. Also, creating a fresh Commerce Account for your firm is possible.
Make Ads: You can generate ads and post them on social handles, boost performance, and promote your pages via this tool.
Check Insights: You acquire a detailed structure of the overall performance, like trends, content activity, and more details about your audience by using this tool. Noting these aspects assist you in inspecting growth and profits.
Use Advanced Tools: In Business Suite, you'll locate Facebook tools and settings that might aid you in managing your firm. Gain access to the More Tools section to acquire the same. The other tools comprise Ads Manager, Page, and Business Settings. You can also navigate to your Facebook Page from here.
Facebook also states that they further plan to make this tool the chief interface of firms of all sizes and kinds that use Facebook, Instagram, Messenger, and WhatsApp. They aim to make Business Suite the most powerful tool for operating pages and accounts. Getting used to this advanced tool will simplify adjusting to the latest tools like Meta Business Suite.
Further, it is a striking tool for every organization, no matter its size. Using it with other advanced tools will benefit you even more. The Business Suite is a suitable pick over the Business Manager for multiple reasons. It offers striking features and enables you to make the most out of your Facebook page and account.
3) Meta Business Suite
Lastly, Meta Business Suite is the latest amendment, and the tool assists you in managing all your Instagram pages in one place. It grants access to multiple tools that permit you to easily access your firm's online presence and reach more clients. Some amends you can expect to see in the Meta Business Suite are:
Mobile and Desktop experience: Managing your firm's online presence has now become much simpler by using the all-new Meta Business Suite app. It gives you more convenient access, and you can operate your pages on the run or wherever you go using this top feature.
New Home Display: Checking the latest notifications for your Instagram and Facebook Accounts now has an altogether different experience. You can obtain a summary of the most recent ads and details about posts from here.
Activity insights: View who has liked, commented, or shared your posts, ad updates, and other activity related to your Facebook Page and Instagram handle.
Integrated Inbox: Reading and checking new messages on your Facebook Page, Messenger, and Instagram handle is more manageable. Further, creating automated responses and saving precious time is now accessible via this striking tool.
Post Features: Schedule or Publish fresh posts for your Facebook Page and Insta feed. Further, inspect all the recent activity and details about the posts your share or create. The tool also permits you to schedule video posts and varied content.
Generating new ads: Making new ads, boosting the performance of posts and promoting your Facebook Page, inspecting metrics, and all other essential aspects are simple to access here. Further, you also have an entrée to the Ads Manager to check on campaign details.
Better Insights view: Study how paid and organic are profiting with the relevant data about their activity. Also, you can access additional details about the audience using this tool.
Enable more tools: Locating multiple tools and settings that might assist in profiting your business's online presence is easily possible by accessing more tools. You can access multiple settings and get better overall performance for your pages and accounts.
The Meta Business Suite surely has invited the latest amends to suit all your needs. Soon it will take over the traditional methods and offer the finest assistance to users. We suggest you familiarize yourself with it to post your video content and other essential data to make the most profit.
Meta Business Suite: In Summary
Managing your Facebook assets with the most efficiency necessitates fine tools. The Meta Business Suite is fine assistance to manage your Facebook page, and Instagram handle. It offers exceptional tools and features to meet requirements. The tool also assists you in noting growth and gives you an overall view of insights to check on performance. Further, creating ads, generating posts, and scheduling all data has become much simpler. If you have not yet opted for Facebook Business Manager, doing so will certainly profit you. The guide must have certainly given you a clear idea about the Business Suite and its uses. Identify your business needs and make suitable amends for your online presence. However, before making any final choice ensure you check on the business manager's pros and cons to make a valuable decision.
Free Instagram Tools


